

Disclosure: This post may contain affiliate links. If you purchase something through one of my links, I may earn a small commission at no additional cost to you.
🌙✨ Who says your walls can’t use a little moon magic?
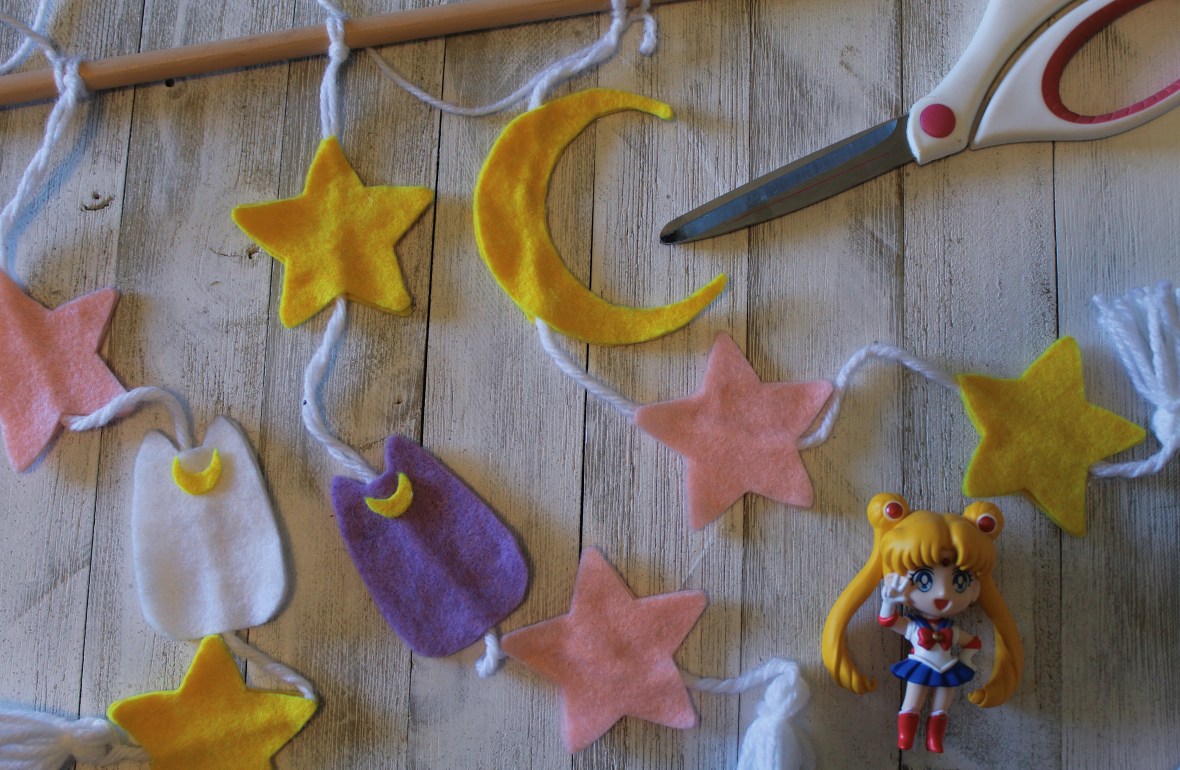
If you’re a fan of Sailor Moon, magical girls, or just cute celestial decor, this DIY felt wall hanging is a fun way to add a little fandom-inspired charm to your space. The project uses inexpensive craft supplies like felt, yarn, and a wooden dowel to create a whimsical decoration featuring stars, a crescent moon, and adorable little cat shapes.
And you don’t need to be an expert crafter to make it!
I love crafts that look complicated when they’re finished but are actually pretty simple to put together. This one is basically cutting felt shapes, arranging them on pieces of yarn, and putting everything together on a wooden dowel. The result is a cute, cozy wall hanging that looks right at home in a bedroom, craft room, reading nook, or anywhere else that could use a little extra magic.
So grab your felt and yarn, and let’s make some moon magic! 🌙⭐
🌙 Get the Free Template!
Want to make your own? I’ve made a free printable template with the stars, crescent moon, and adorable cat shapes used for this project.
✨ Download the Free Sailor Moon-Inspired Wall Hanging Template ✨
Print the template at 100% / Actual Size, then use the pieces to create your felt shapes. Feel free to resize or customize the pieces to make your wall hanging completely your own!
The template is for personal use only. Please do not sell or redistribute the template.
So grab your felt and yarn, and let’s make some moon magic! 🌙⭐
What You’ll Need
Here’s everything you’ll need to make your own felt wall hanging:
- Wooden dowel, approximately 12–18 inches long
- Felt sheets in your preferred colors
- White or coordinating yarn
- Freezer paper
- Hot glue gun and glue sticks
- Scissors
- Pencil
- Iron
- Printed pattern for your shapes
- Cardboard or your fingers for making tassels
Optional Supplies
You can also add a few extras if you want to give your wall hanging even more personality:
- Beads
- Sequins
- Glitter
- Fabric paint
- Decorative charms
- Embroidery thread
Choosing Your Colors
One of the fun things about this project is that you can customize the colors however you want.
For my wall hanging, I went with a combination of pink, yellow, white, and lilac, which gives it a soft, whimsical celestial look.
If you want something more obviously Sailor Moon-inspired, you could use colors associated with your favorite characters. Or keep things soft and pastel for a more subtle magical-girl aesthetic.
You could even make several wall hangings in different color combinations!
How to Make a Sailor Moon-Inspired Felt Wall Hanging
Prepare Your Pattern
Start by choosing the shapes you want to use.
For this wall hanging, I used a combination of:
- Stars
- A crescent moon
- Cat-inspired shapes
- Small decorative details
You can use a free downloadable pattern or create your own shapes. If you’re making your own pattern, don’t worry about making everything perfect. Simple shapes actually work really well for felt crafts.
Once you have your pattern, print it out.
Place a sheet of freezer paper over your pattern with the waxy side facing down. Trace each shape onto the freezer paper.
Carefully cut out your traced shapes.
Transfer Your Pattern to the Felt
Now it’s time to turn those paper patterns into felt pieces.
Place each freezer paper shape on top of the appropriate piece of felt with the waxy side facing down.
Set your iron to a low heat setting and gently press the freezer paper onto the felt.
The wax on the freezer paper will temporarily adhere to the felt, creating a handy stencil that won’t slide around while you’re cutting.
This is one of my favorite tricks for working with felt because it makes cutting out smaller or more detailed shapes much easier.
Just remember: You only need a little heat. Don’t leave the iron sitting on the felt.
Cut Out Your Felt Shapes
Once your freezer paper is attached, carefully cut around each shape.
Take your time with this step. A sharp pair of scissors will make it much easier to get clean edges.
When you’re finished cutting, gently peel the freezer paper away from the felt.
Repeat the process until you have all of the pieces you need.
You should now have a little collection of colorful felt stars, moons, cats, and whatever other shapes you’ve decided to include.
Plan Your Design
Before reaching for the hot glue gun, lay everything out on your work surface.
This is where you get to play around with your design.
Decide which pieces you want on each strand and how far apart you want them to be. I recommend making the three strands different lengths so the finished wall hanging has a little more movement and dimension.
For example, you could have:
First Strand: Star → Cat → Star
Second Strand: Star → Cat → Star
Third Strand: Crescent Moon → Star → Star
Don’t worry about making the strands identical. A little asymmetry makes the finished piece feel more handmade and whimsical.
Cut Your Yarn
Cut three long pieces of yarn for your hanging strands.
Make them different lengths if you’d like a layered effect.
You’ll also need a separate piece of yarn to create the hanger at the top of the wooden dowel.
Before cutting everything, it’s better to make your yarn pieces a little longer than you think you’ll need. You can always trim them later!
Attach the Felt Pieces
Once you’re happy with your arrangement, start attaching the felt pieces to the yarn.
You can use a small amount of hot glue to secure the yarn to the back of each felt piece.
Be careful not to use too much glue. A little goes a long way with felt!
If you prefer a more durable finish, you can also sew the pieces onto the yarn using embroidery thread.
Continue until you’ve attached all of your felt pieces to the three strands.
Make the Tassels
What’s a cute wall hanging without tassels?
To make a simple yarn tassel, wrap yarn around your fingers or around a small piece of cardboard several times.
The more times you wrap it, the fuller your tassel will be.
Carefully slide the wrapped yarn off and tie another piece of yarn tightly around the top. Cut through the loops at the bottom and trim the ends until you have a neat tassel.
Make one for the bottom of each strand.
You can leave the tassels slightly uneven for a relaxed handmade look or trim them all to the same length for a cleaner appearance.
Attach the Strands to the Dowel
Now it’s time to bring everything together!
Tie the top of each yarn strand securely around the wooden dowel.
Space the three strands evenly across the dowel, adjusting their positions until you’re happy with how everything looks.
Give the strands a gentle tug to make sure the knots are secure.
If you want to add some extra color or texture, you can also wrap yarn around portions of the wooden dowel.
Create the Hanging Loop
To make your wall hanging easy to hang, cut another long piece of yarn.
Tie one end to each side of the wooden dowel.
Adjust the length until you have a comfortable loop for hanging.
Trim away any excess yarn.
And that’s it!
You now have your very own magical-girl-inspired felt wall hanging. 🌙✨
Make It Your Own
The best part about making your own decor is that you don’t have to follow the original design exactly.
There are so many ways you can customize this project.
Try Different Shapes
Instead of stars and cats, try adding:
- Sailor Moon symbols
- Hearts
- Bows
- Planets
- Clouds
- Flowers
- Crystals
- More moons and stars
You could even create a wall hanging dedicated to your favorite Sailor Scout.
Change the Colors
Want something bright and colorful? Go for it!
Prefer a soft pastel aesthetic? Choose pale pinks, lavender, baby blue, cream, and yellow.
You could also use black, silver, dark blue, and purple for a more mysterious celestial look.
Add Some Sparkle
Because honestly, everything is better with a little sparkle.
Try adding glitter felt, sequins, metallic embroidery thread, or small charms to your design.
Just don’t go too crazy with the glitter unless you’re prepared to find it in your house approximately six months later. 😂
Where to Hang Your Wall Art
Once your project is finished, you have plenty of options for where to display it.
Try hanging it:
- Above your bed
- Beside your bookshelf
- In your reading nook
- In your craft room
- Above your desk
- In a gaming room
- On a fandom-themed gallery wall
It would also make a fun handmade gift for a fellow Sailor Moon fan.
Tips for Making This Project
Use Sharp Scissors
Felt can be surprisingly difficult to cut cleanly with dull scissors. A sharp pair of craft scissors will help you get much smoother edges.
Don’t Overuse the Glue
Hot glue can make felt stiff and lumpy if you use too much. Start with a small amount and add more only if you need it.
Plan Before You Glue
Once the glue is on, moving pieces around becomes much harder. Lay everything out first and take a quick photo of your arrangement if you need a reference.
Mix Up the Lengths
Having all three strands exactly the same length can make the wall hanging look a little stiff. Different lengths create a more playful, flowing design.
A Little Moon Magic for Your Wall
You don’t need a huge budget or a complicated pattern to make fandom-inspired decor that feels special.
With some colorful felt, yarn, a wooden dowel, and a little creativity, you can create something that’s completely your own.
I love how simple shapes can come together to create something that feels so whimsical. The stars, crescent moon, little cats, and tassels give this wall hanging a cozy celestial feel without requiring a ton of crafting experience.
And, of course, if you’re a Sailor Moon fan, there’s something especially fun about having a little bit of magical-girl energy hanging on your wall.
So grab your supplies, put on your favorite Sailor Moon episode, and get crafting.
In the name of the Moon, let’s make some cute decor! 🌙⭐💖
Related Post: Sailor Moon Lighted Glass Block
Pin Me!













Leave a Comment